DiviRise documentation
DiviRise is a set of native Divi 5 extensions that turn three plain WordPress and WooCommerce screens into pages you design in the Divi builder. Version 1.0.0 ships three features, each switched on or off from DiviRise > Control Panel.
Introduction
| Feature | What it replaces | Needs WooCommerce |
|---|---|---|
| Customize My Account Page | WooCommerce's unstyled My Account area and its subpages | Yes |
| Custom Login Page | WordPress's wp-login.php screens: log in, register, lost and reset password | No |
| Custom Thank You Page | WooCommerce's order-received page after checkout | Yes |
A feature that is switched off loads nothing: no modules in the builder, no hooks, no settings screens. Every feature ships switched on, so an update never removes something the site was using.
DiviRise is Divi 5 only. It uses the Divi 5 module library, style engine and block storage, none of which exist in Divi 4. There is no licence key; everything works as soon as the plugin is active.
Requirements and installation
DiviRise needs WordPress 6.5+, PHP 7.4+ and Divi 5 with the Divi 5 experience enabled; WooCommerce 8.0+ is needed only for the My Account and Thank You features.
| Requirement | Minimum | Tested up to |
|---|---|---|
| WordPress | 6.5 | 7.1 |
| PHP | 7.4 | — |
| Divi | Divi 5 theme or Divi Builder 5 | — |
| WooCommerce (optional) | 8.0 | 11.1 |
- Activate Divi 5 (or Divi Builder 5) with the Divi 5 experience enabled.
- In Plugins > Add New > Upload Plugin, upload the DiviRise zip and activate it.
- For the My Account or Thank You features, install and activate WooCommerce. If it is missing, DiviRise > Control Panel offers an install button.
- Open DiviRise > Control Panel and confirm the features you want are switched on.
DiviRise is declared compatible with WooCommerce High-Performance Order Storage (HPOS). Updates arrive through the Divi Marketplace's own update system, like any other Marketplace product.
Getting started
The fastest route to a designed My Account page is a starter layout, which needs no module settings.
- Go to DiviRise > Control Panel and check that Customize My Account Page is on and WooCommerce is reported active.
- Go to DiviRise > Starter Layouts. Under Brand colour, keep Use the theme's colour or choose Use my own colour, then save.
- Pick a layout and press Add to Divi Library. Two layouts are added:
- … — account page — the whole page, menu and content together.
- … dashboard section — only the contents of the Dashboard.
- Edit your WooCommerce My Account page with the Divi builder and load the account page layout with Add From Library. Save.
- Optional: in DiviRise > Account Tabs > Built-in sections, assign the dashboard section layout to the Dashboard to replace WooCommerce's two-line welcome.
Never assign the account page layout to a section. The menu would render twice inside it.
The brand colour drives every starter layout. Change it later and every installed layout re-colours on the next page load; nothing needs reinstalling.
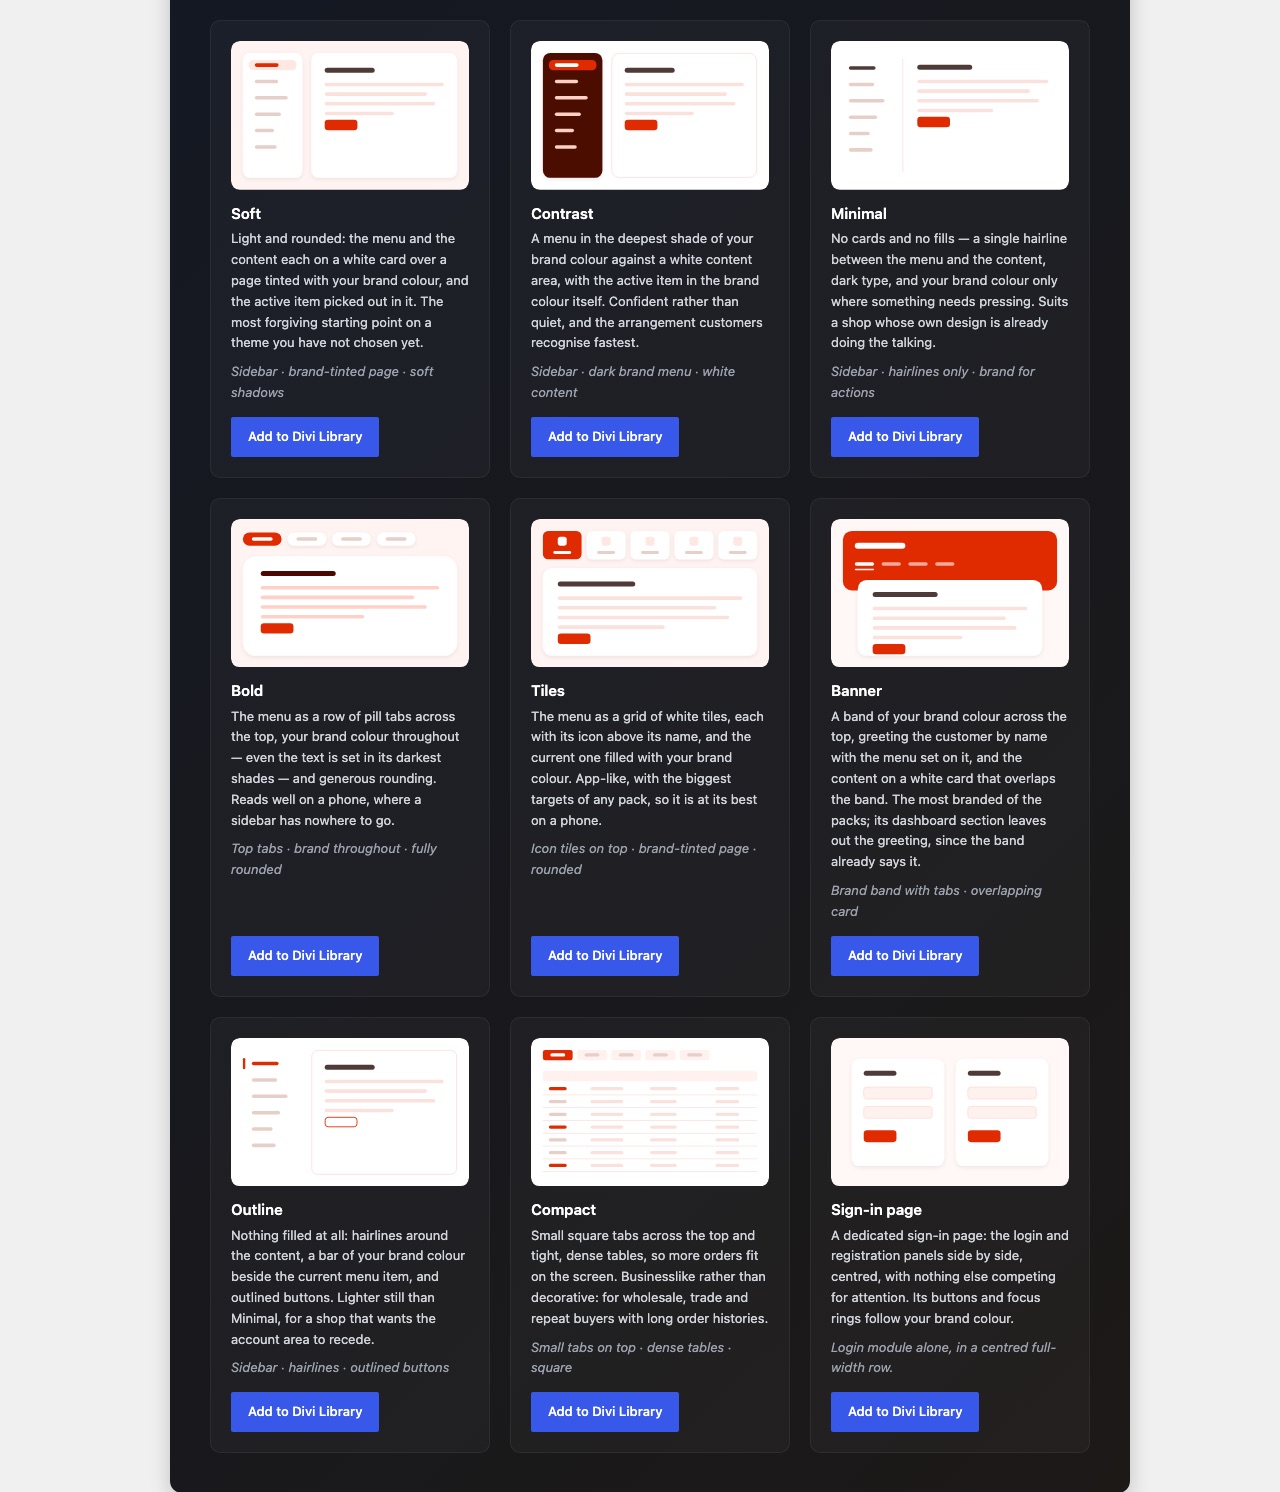
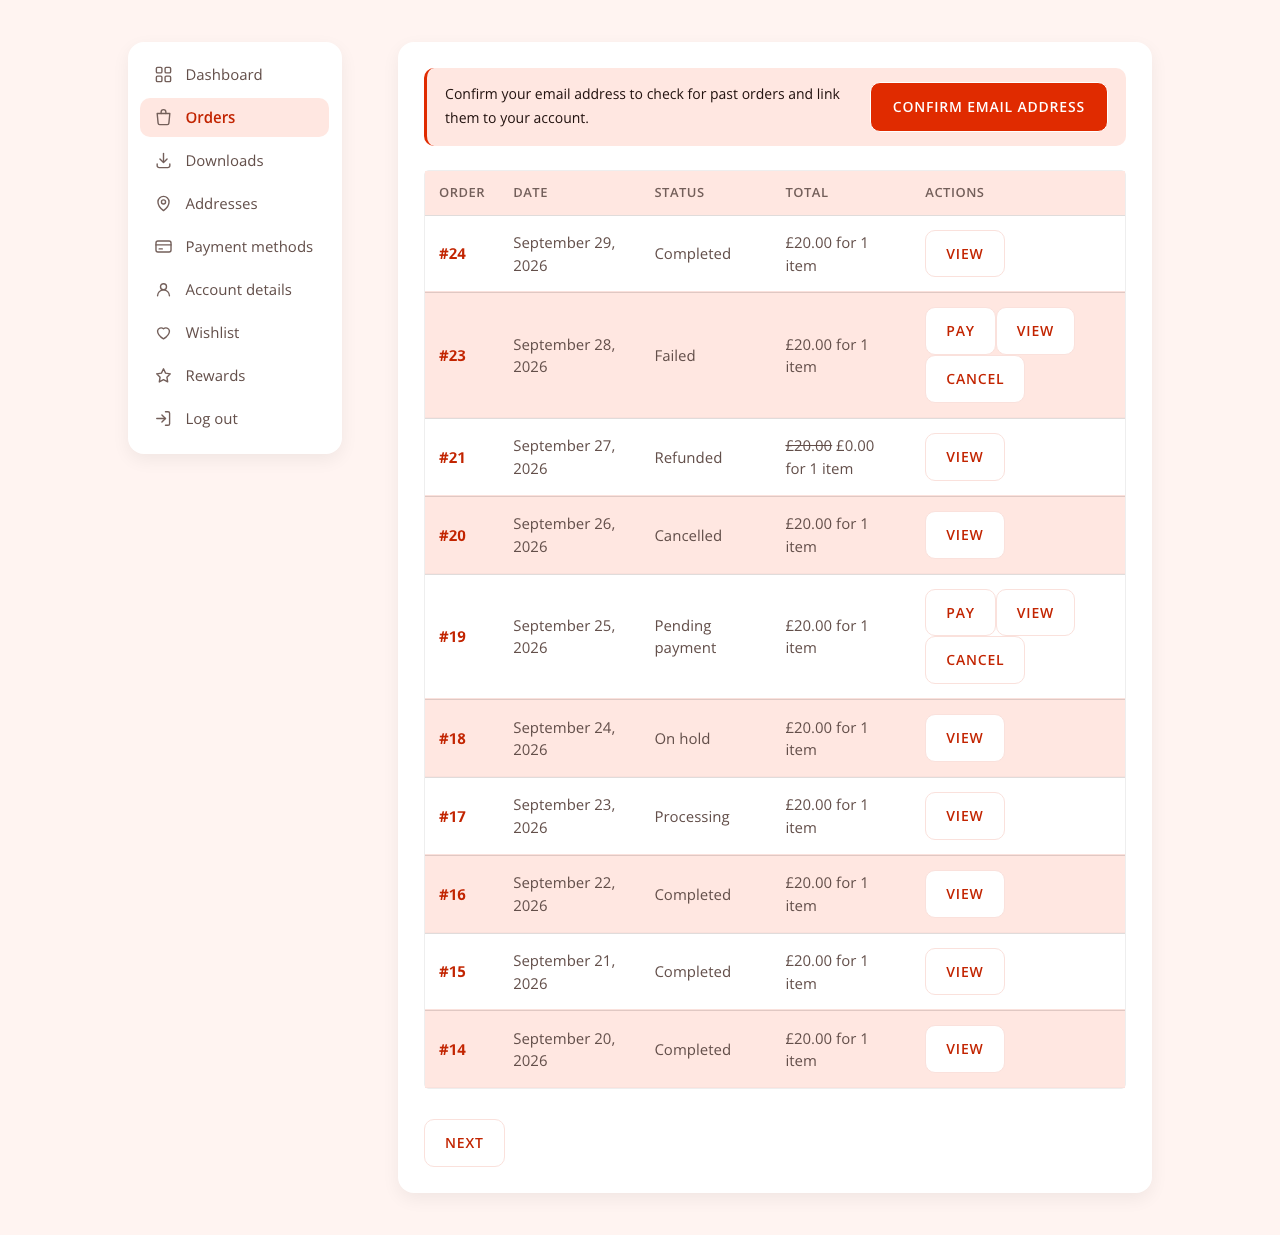
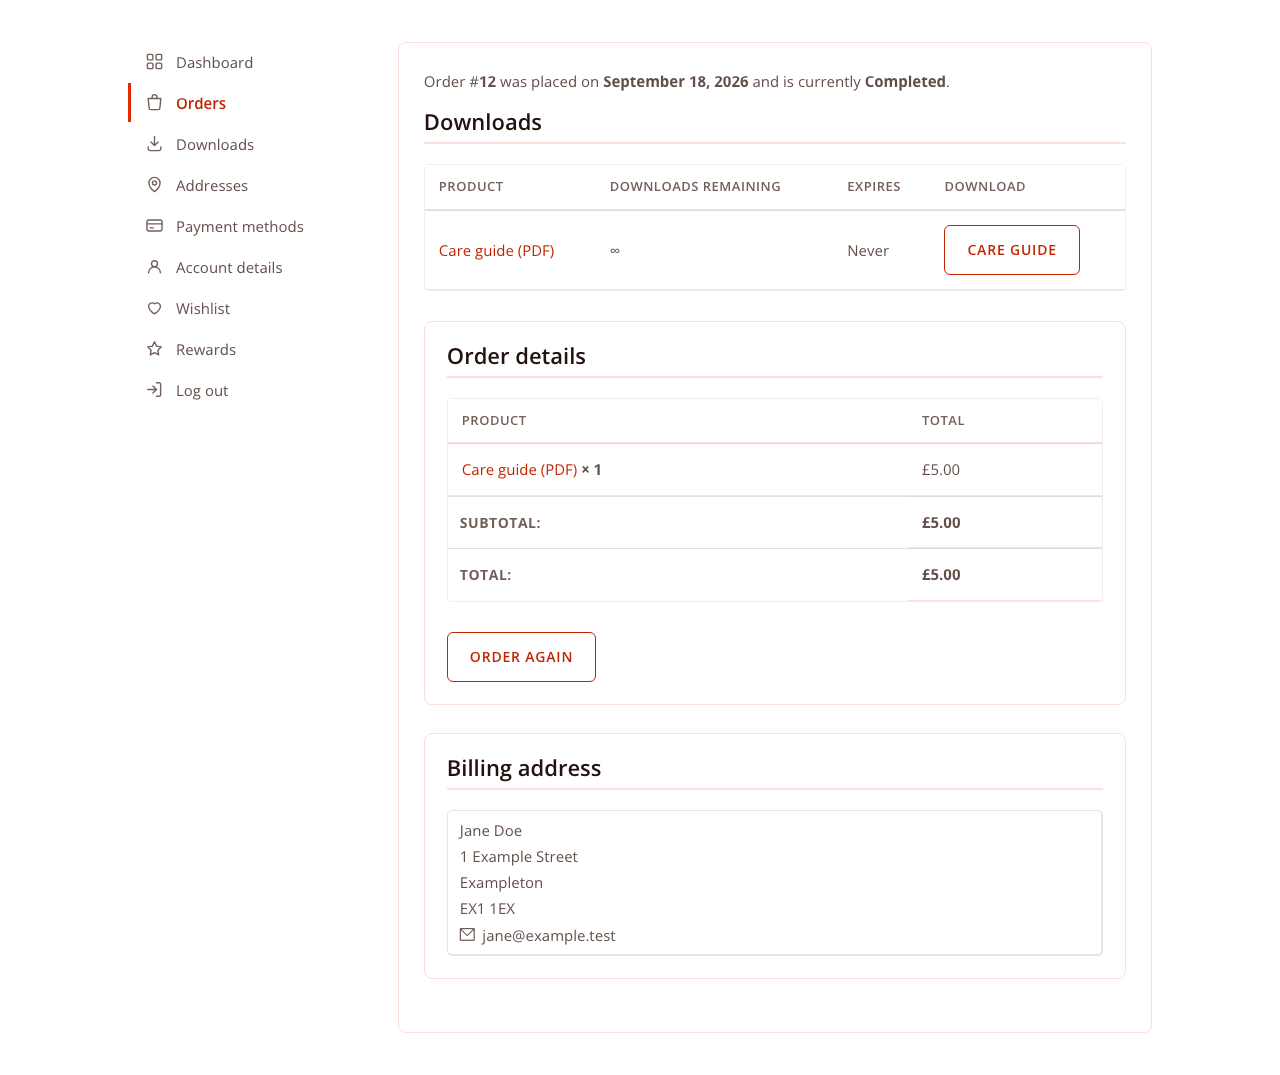
| Starter layout | Shape | Best for |
|---|---|---|
| Soft | Sidebar, white cards on a brand-tinted page | A safe first choice on any theme |
| Contrast | Sidebar, dark brand menu, white content | The layout customers recognise fastest |
| Minimal | Sidebar, hairlines only | Shops whose own design already leads |
| Bold | Pill tabs on top, brand colour throughout | Phones, where a sidebar has no room |
| Tiles | Grid of icon tiles on top | App-like feel, biggest tap targets |
| Banner | Brand band with a greeting, overlapping card | The most branded look |
| Outline | Sidebar, outlines, outlined buttons | An account area that recedes |
| Compact | Small square tabs, dense tables | Wholesale and repeat buyers with long order lists |
| Sign-in page | Login and register panels, centred | A standalone sign-in page |
To set up the login or thank-you page instead, see Login page and Thank You page.
My Account page
The My Account page is built from three Divi 5 modules in the Woo Modules category, placed on WooCommerce's My Account page or in a Theme Builder body layout assigned to it.
| Module | What it shows |
|---|---|
| Woo My Account Navigation | The account menu, as a vertical list, a tab bar or a grid of cards, switchable per breakpoint |
| Woo My Account Content | The section the customer opened: Dashboard, Orders, Downloads, Addresses, Account details, or the sign-in form for guests |
| Woo My Account Login | The full sign-in journey, on any page: log in, register, lost and reset password |
The Content module fires WooCommerce's woocommerce_account_content action, so sections added by Subscriptions, Memberships, Bookings and similar extensions render as they should.
Signed-out visitors see no navigation, and the Content module shows WooCommerce's login and registration form, as the stock template does.
In the builder, the canvas is a static preview. Clicking a menu item does not change the Content module; choose the section to design under Content > Account Content > Preview Endpoint.
Redesigning the built-in sections
DiviRise > Account Tabs > Built-in sections points a Divi Library layout at Dashboard, Orders, Downloads, Addresses, Payment Methods, Account Details or Order Details.
- Replace the WooCommerce content — your layout instead of WooCommerce's. Only the Dashboard can be replaced; replacing another section would remove its table or forms with no way back.
- Show above or Show below — your layout beside WooCommerce's, such as a returns policy under Orders.
The section's URL and menu item stay as they are; only what renders inside changes. A layout sits in a Divi section, which Divi paints white. On a coloured page, set the section background to transparent in the Divi Library, or tick Make layout sections transparent (off by default) to do it for every assigned layout.
Personal greetings: customer shortcodes
These shortcodes work in any Divi module, including button labels and link URLs. All output is escaped.
| Shortcode | Prints |
|---|---|
[divirise_customer field="first_name" fallback="there"] | first_name, last_name, full_name, display_name, username or email |
[divirise_order_count] | Orders placed; add status="completed" for one status |
[divirise_download_count] | Downloads available |
[divirise_total_spent] | Lifetime spend, as a price |
[divirise_account_url endpoint="orders"] | The URL of any account section, custom tabs included |
[divirise_logout_url] | A working logout URL |
[divirise_dashboard_greeting] | WooCommerce's "Hello Jane (not Jane? Log out)" |
[divirise_dashboard_links] | WooCommerce's line of links to orders, addresses and account details |
[divirise_if logged_in="yes"]…[/divirise_if] | Its content only when the condition holds; also has_orders="yes" or "no" |
When a layout replaces the Dashboard, add [divirise_dashboard_greeting] and [divirise_dashboard_links] so customers keep their way to Orders and Addresses.
Styling one section differently
The Content module adds a class for the section on display, such as divirise_my_account_content--endpoint-orders. Use it in the module's Custom CSS or a child theme:
.divirise_my_account_content--endpoint-orders .shop_table td { font-size: 13px; }Account menu and custom tabs
The account menu is shaped in two places: the Navigation module controls how it looks on one page, and DiviRise > Account Tabs controls what exists and who sees it, site-wide.
In the Navigation module
| Settings group | What you set |
|---|---|
| Navigation Layout | Vertical List, Horizontal Tabs or Grid Cards, per breakpoint; alignment; icons and labels on or off (icon-only keeps screen-reader labels) |
| Menu Items | Drag items into order; choose or upload each item's icon; show or hide each WooCommerce item |
| Menu Item Labels | Rename any item; leave empty to keep WooCommerce's label |
| Menu Item Container, Menu Item Style, Active Menu Item Style (Design tab) | The item box and its separator line, the link inside it, and the current item |
Payment Methods is shown by default, even when no gateway supports saved cards and WooCommerce would hide it. Switch it off under Menu Items to follow WooCommerce.
Adding your own tabs
A custom tab renders a layout from the Divi Library and appears in the menu automatically.
- Build the tab's content and save it to the Divi Library.
- Go to DiviRise > Account Tabs.
- Enter a name and a URL slug, pick an icon and choose the layout.
- Save. The tab appears in the menu and at
/my-account/your-slug/.
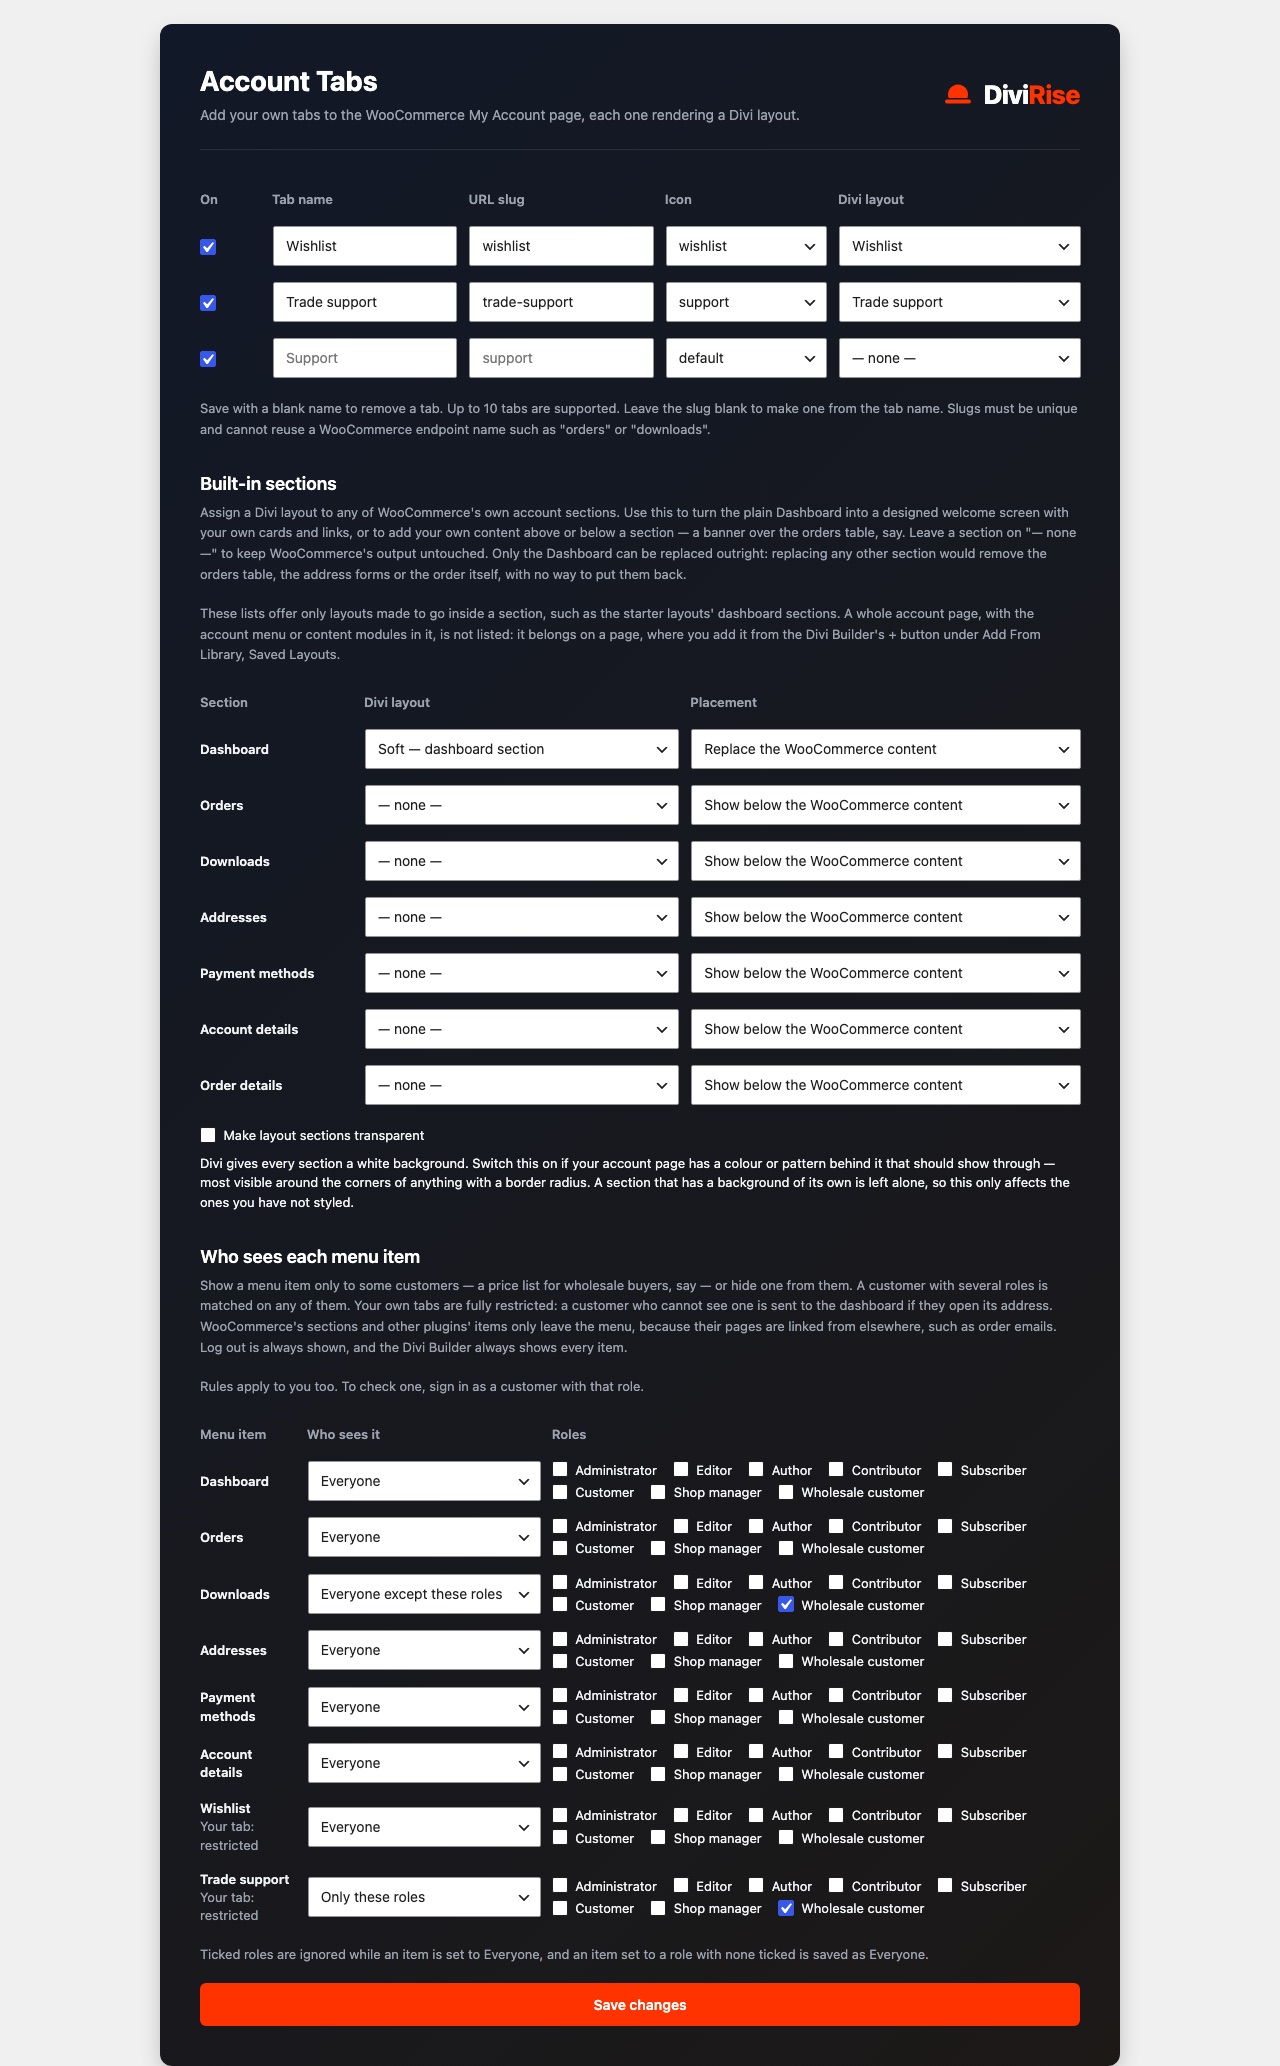
Slugs must be unique, and cannot reuse a WooCommerce section (orders, downloads) or a WordPress query var (page). A blank slug is made from the tab's name. Up to 10 tabs are supported; save a tab with a blank name to remove it. Rejected slugs are skipped on save and listed. If a tab returns a 404, re-save Settings > Permalinks.
Who sees each menu item
Under Who sees each menu item, every menu item can be shown to everyone, only some roles, or everyone except some roles. A customer with several roles is matched on any of them.
- Your own tabs are restricted. A customer without access who opens the address is sent to the Dashboard.
- WooCommerce's sections and other plugins' items only leave the menu. Their pages still open, because emails link to them.
- Log out is always shown, and the builder shows every item so you can design for any role.
Rules apply to administrators too. To check one, sign in as a customer with that role. The active rules are listed in the system report on DiviRise > Status.
Login page
The Login page feature puts WordPress's login, registration, lost-password and reset screens on a page you design in Divi. It works without WooCommerce and is set up under DiviRise > Login Page.
Setting it up
- Under Start from a design, press Create and use on Centred card, Split or Minimal. A published page called "Log in" is created with the Login Form module on it, and becomes your login page at once.
- Edit the page in Divi. The Login Form's Preview State shows each step on the canvas: log in, register, lost password, set a new password, check your email, already logged in.
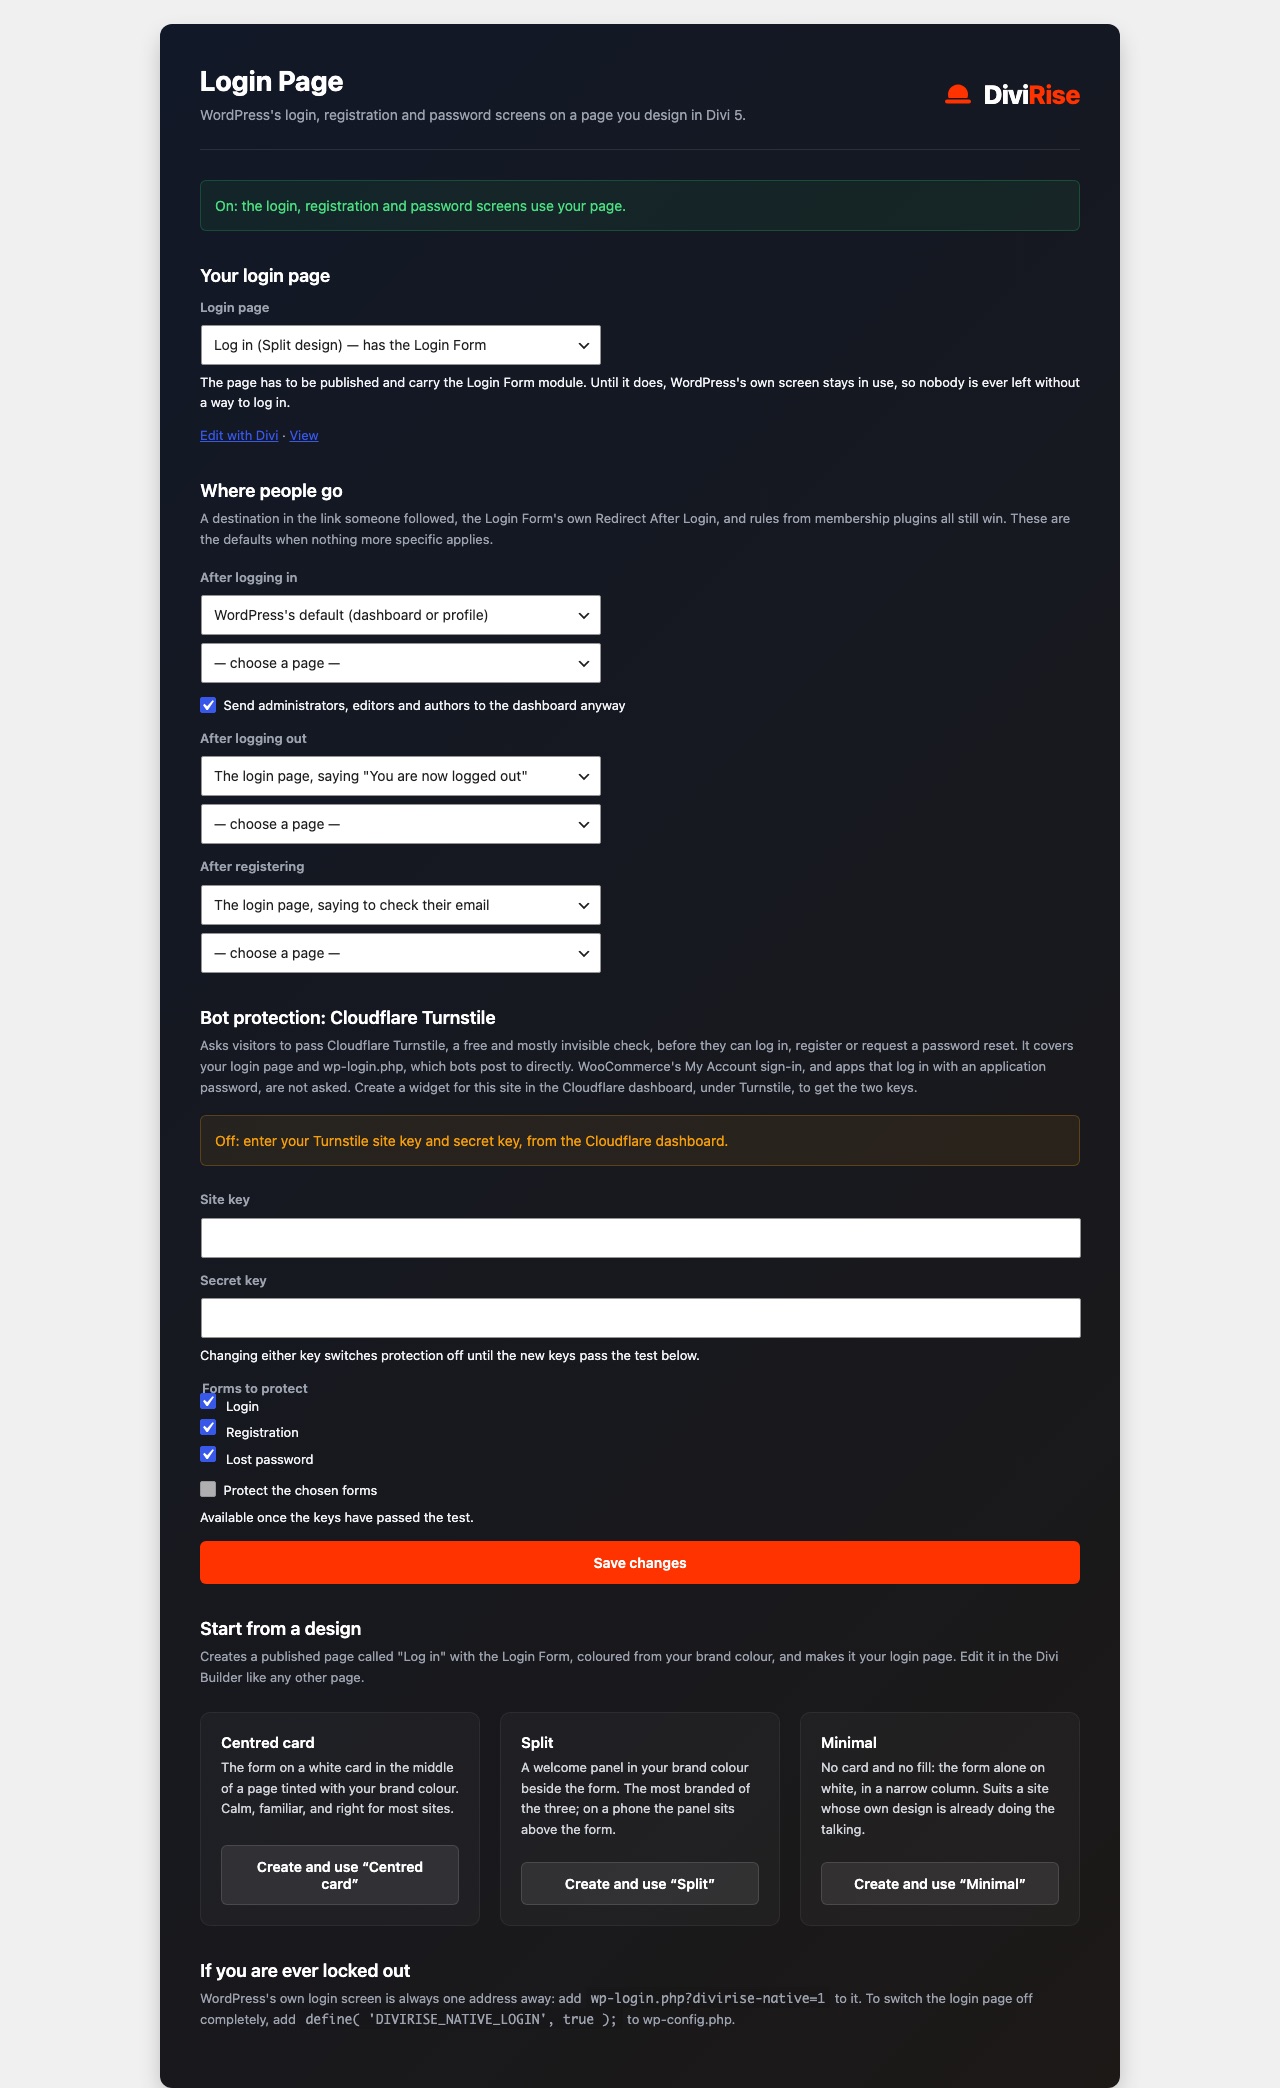
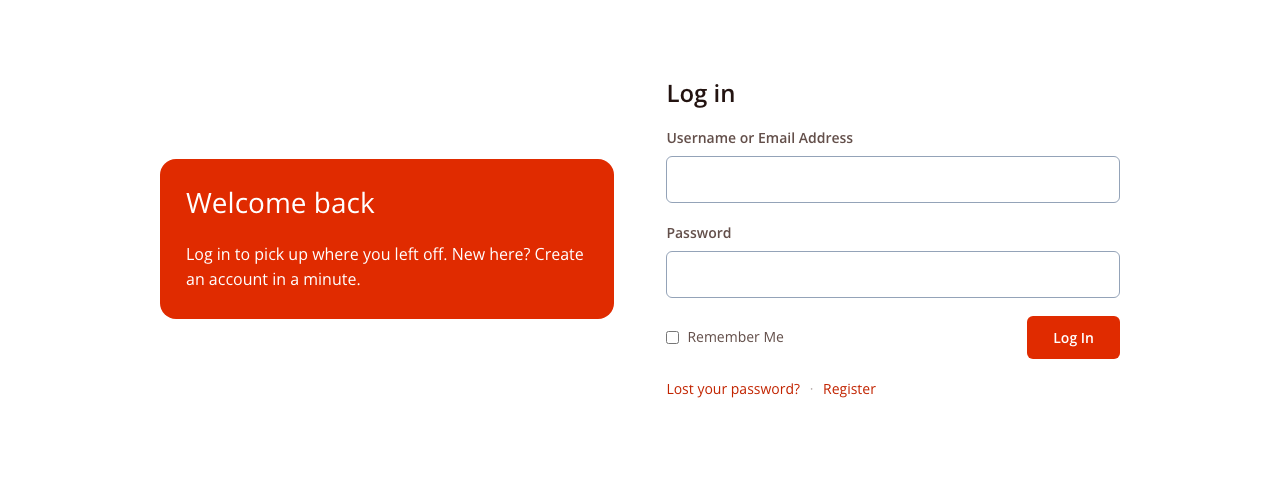
Or build your own page with the Login Form module and choose it under Your login page. The page is used only while it is published, not password-protected, and holds a Login Form; otherwise WordPress's own screen stays in use and the Login Page screen says why.
What goes to your page
- Visits to
wp-login.phpto log in, register, recover a password or follow an emailed reset link. - WordPress's login, registration and lost-password links, including opening
/wp-admin/while logged out.
wp-login.php still handles everything else: logging out, the dashboard's session-expired pop-up, password-protected posts, privacy confirmations, two-factor screens and form posts from apps. On a shop, customers keep signing in on My Account; this page is for wp-login.php's audience.
If you are locked out
- Add
?divirise-native=1towp-login.phpfor WordPress's own screen, for one visit. - Or add
define( 'DIVIRISE_NATIVE_LOGIN', true );towp-config.phpto switch the login page and its bot protection off entirely.
Where people go
After logging in, logging out and registering, send people to WordPress's default, the home page or a page you choose. By default, logging out returns people to the login page with "You are now logged out", and registering returns them there with a prompt to check their email. Send administrators, editors and authors to the dashboard anyway is on by default. A destination in the link someone followed, the module's Redirect After Login, and membership-plugin rules still take priority.
Bot protection: Cloudflare Turnstile
Turnstile is Cloudflare's free, mostly invisible check, asked before logging in, registering or requesting a reset. It is off until set up.
- In the Cloudflare dashboard, under Turnstile, add a widget for your site and copy its site key and secret key.
- Enter both under Bot protection on the Login Page screen, tick the forms to protect (login, registration, lost password), and save.
- Pass the check under Test the keys and press Test and switch on.
Protection switches on only when Cloudflare accepts your keys, so wrong keys never lock anyone out. It covers your login page and wp-login.php; My Account sign-in and application passwords are not challenged.
- Another CAPTCHA plugin active: DiviRise's Turnstile stands aside, so nobody faces two challenges.
- Cloudflare unreachable: logins go ahead and the Status screen records it; registrations and resets are refused until it returns.
- Test keys in use: they let every visitor through, and the screen warns you.
While Turnstile is on, the forms load Cloudflare's script and send each submission's IP address and browser signals to Cloudflare. A suggested privacy-policy paragraph is added under Settings > Privacy.
Other login plugins
Two-factor, CAPTCHA and login-limiter plugins keep working. The forms are processed by WordPress's own login functions, which fire the hooks those plugins rely on.
Thank You page
The Thank You page feature replaces WooCommerce's order-received page with a page you design in Divi, while the customer stays on WooCommerce's own address. It needs WooCommerce and is set up under DiviRise > Thank You Page.
Setting it up
- Under Start from a design, press Create and use on Celebration, Receipt or Split. A published page such as "Thank you (Receipt)" is created from the four Thank You modules and used at once.
- Edit it in Divi. The modules show a sample order on the canvas, so you can style everything without placing an order.
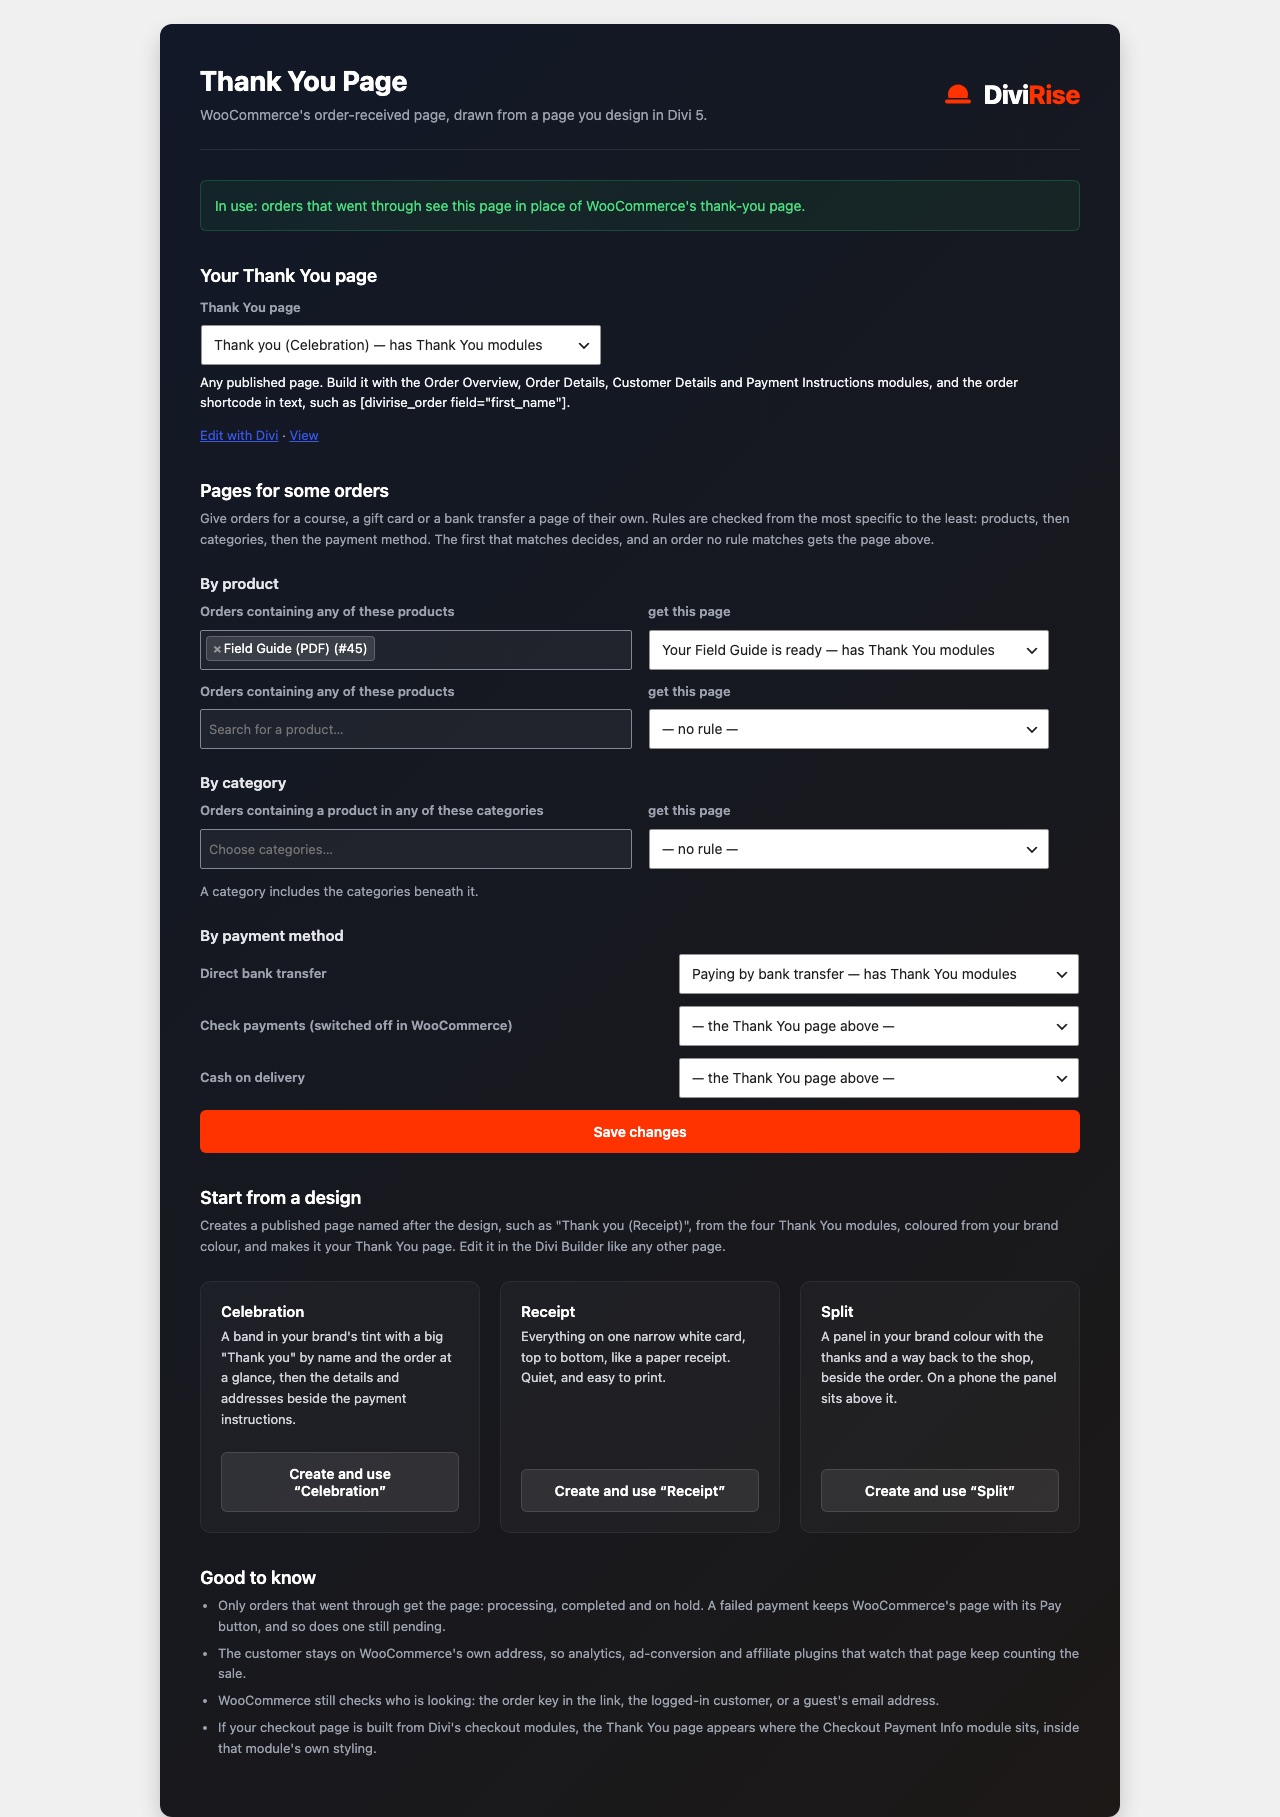
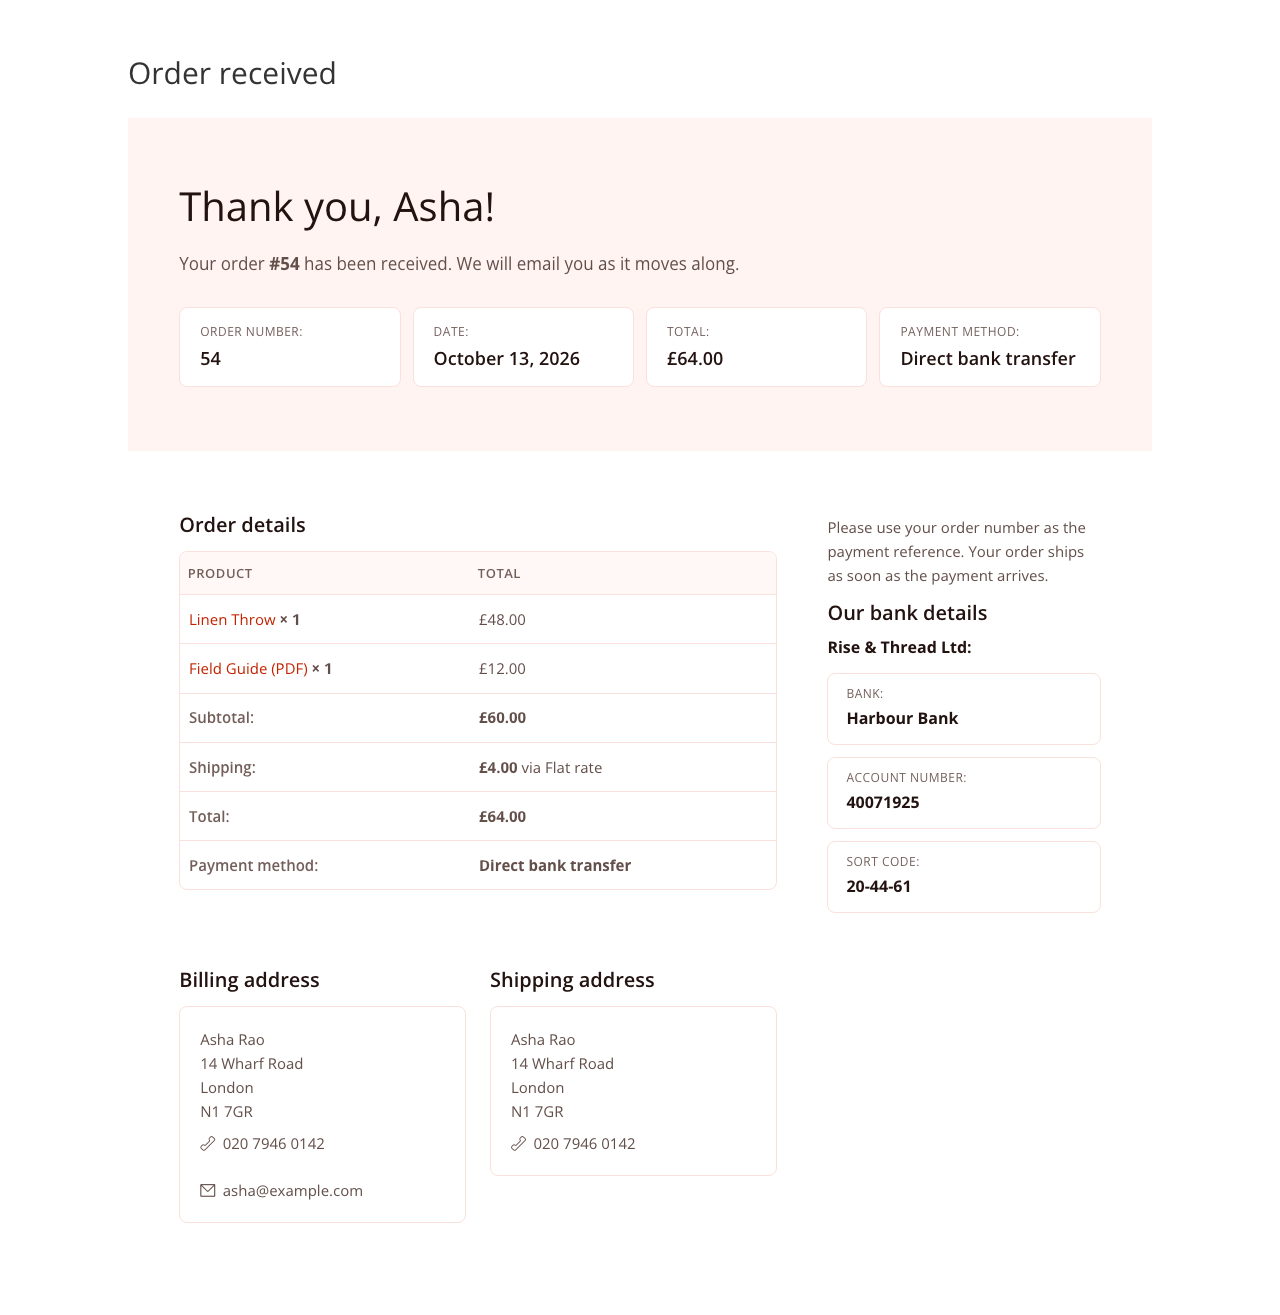
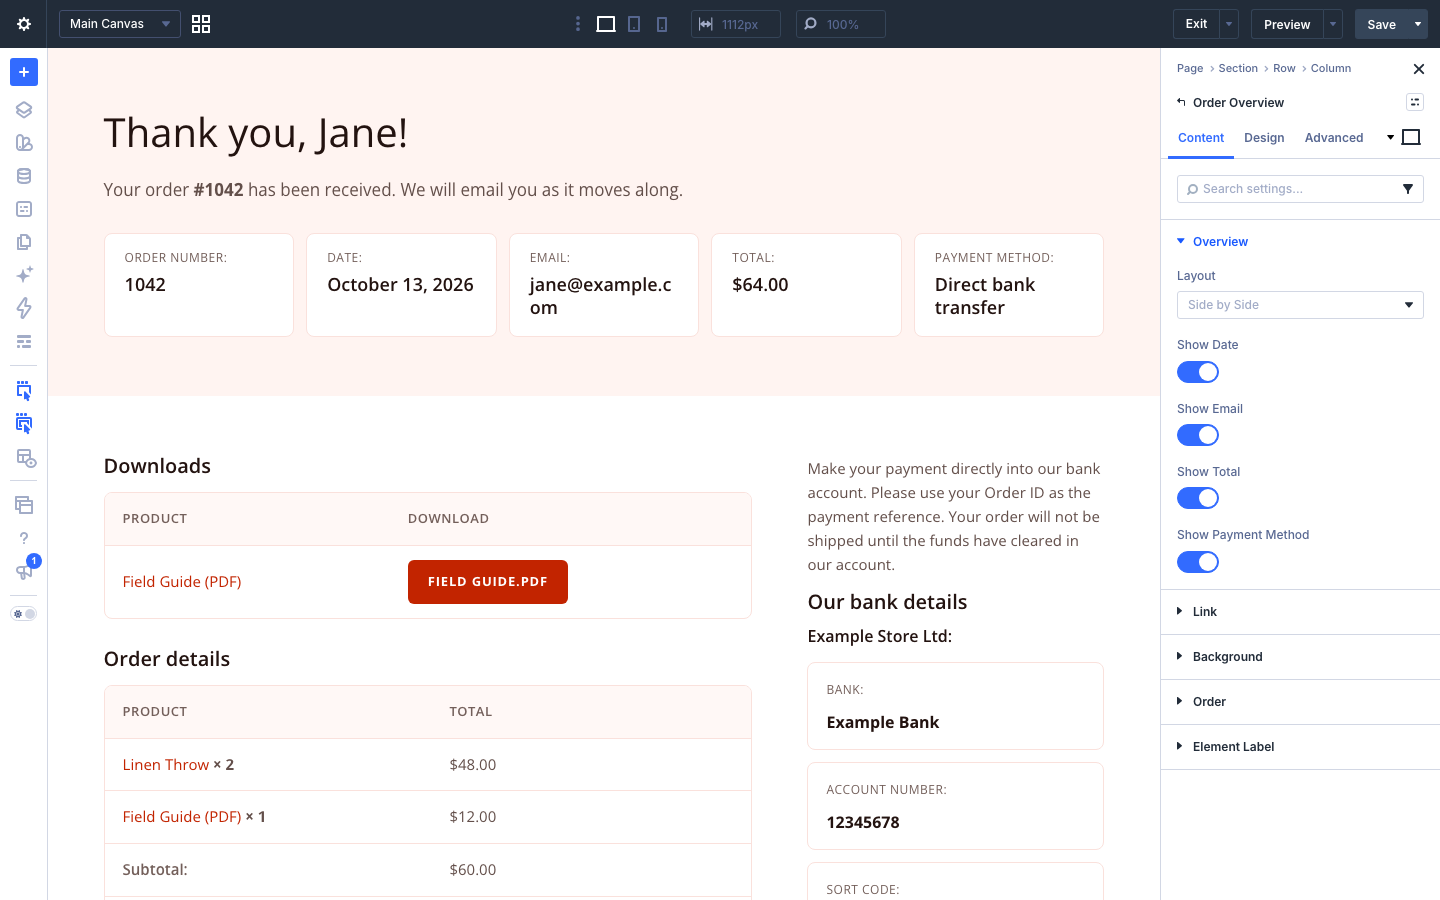
Or build your own page from the four modules and choose it under Your Thank You page. A page that is unpublished, password-protected or deleted is passed over, and WooCommerce's page shows instead.
Which orders see it
Orders that are processing, completed or on hold. Failed, pending, cancelled and refunded orders keep WooCommerce's page, with its Pay button where relevant. Developers can change the list with the divi_rise_thankyou_statuses filter.
The address stays /checkout/order-received/… and WooCommerce's thank-you actions fire once each, so analytics, ad-conversion and affiliate plugins still count the sale. WooCommerce still decides who may view the order: the key in the link, the logged-in customer, or a guest who confirms their email.
Pages for some orders
Under Pages for some orders, give particular orders their own page. Rules are checked in this order, and the first match wins:
- By product — orders containing any chosen product; a variation counts as its product.
- By category — orders containing a product in a chosen category or a category beneath it.
- By payment method — one page per method, such as bank transfer.
- No match — the main Thank You page.
A rule whose page cannot be used is skipped, and the screen says why beside it.
The order in your own words
[divirise_order field="…" fallback="…"] prints one value from the order in a Text or Code module, for example Thank you, [divirise_order field="first_name" fallback="there"]!
- Fields:
number,date,total,payment_method,status,item_count,first_name,last_name,full_name. emailis shown only to the logged-in customer who placed the order.- Anywhere else, or on the page viewed directly, it prints the
fallback.
Good to know
- Viewed directly, the page shows editors a note in place of each module and visitors nothing, and is kept out of search engines.
- If your checkout is built from Divi's checkout modules, the Thank You design appears where the Checkout Payment Info module sits.
- On the order-received page, Divi loads its full stylesheet rather than a per-page selection.
Modules reference
DiviRise adds eight Divi 5 modules. Each honours Divi's Design and Advanced tabs in full, including breakpoints, hover states and custom CSS, and its stylesheet loads only on pages that use it.
| Module | Feature | Content settings | Design groups |
|---|---|---|---|
| Woo My Account Navigation | My Account | Layout, Alignment, Show Icons, Show Labels, Menu Order, Menu Icons, show/hide and rename each item | Menu Item Container, Menu Item Style, Active Menu Item Style |
| Woo My Account Content | My Account | Show, Preview Endpoint, Table Behaviour On Mobile, When Logged Out, Content Alignment | Table, Form Field, Button, Secondary Button, Address Card, Notice, Order Section, Password Toggle, Row Stripes, Order Status Colours |
| Woo My Account Login | My Account | Preview State, Forms To Show, Form Layout, headings, Intro Message, Remember Me and Lost Password links, Redirect After Login, When Signed In | Form Card, Field, Button, Notice, Password Toggle, Body Text |
| Login Form | Login page | Preview State, headings for each step, Intro Message, Remember Me, Lost Password and Register links, Redirect After Login, When Logged In | Form Card, Field, Button, Notice, Body Text |
| Order Overview | Thank You | Layout; show Date, Email, Total, Payment Method | Item Box |
| Order Details | Thank You | Show Heading, Show Downloads | Table, Table Header, Buttons |
| Customer Details | Thank You | Show Headings | Address Box |
| Payment Instructions | Thank You | Show Headings | Details Box |
Woo My Account Login vs. Login Form. Use Woo My Account Login for shoppers signing in to WooCommerce on any page. Use Login Form on the page that replaces wp-login.php; it needs no WooCommerce.
Redirect After Login ignores off-site URLs, so it cannot be turned into an open redirect. Registration appears only when it is enabled in WooCommerce > Settings > Accounts & Privacy (or WordPress's Anyone can register for the Login Form).
Admin screens and the Status report
All DiviRise settings live under the DiviRise menu in the WordPress dashboard. A screen belonging to a switched-off feature is hidden.
| Screen | What it is for |
|---|---|
| Control Panel | Switch features on or off; see whether Divi 5 and WooCommerce are active; follow the Getting started steps |
| Starter Layouts | Add ready-made account layouts to the Divi Library; set the brand colour they use |
| Account Tabs | Custom tabs, layouts for built-in sections, transparent sections, and who sees each menu item |
| Login Page | Create or choose the login page, where people go after login, logout and registration, and Cloudflare Turnstile |
| Thank You Page | Create or choose the Thank You page, and pages for some orders |
| Status | A read-only report of what is actually running, for troubleshooting and support |
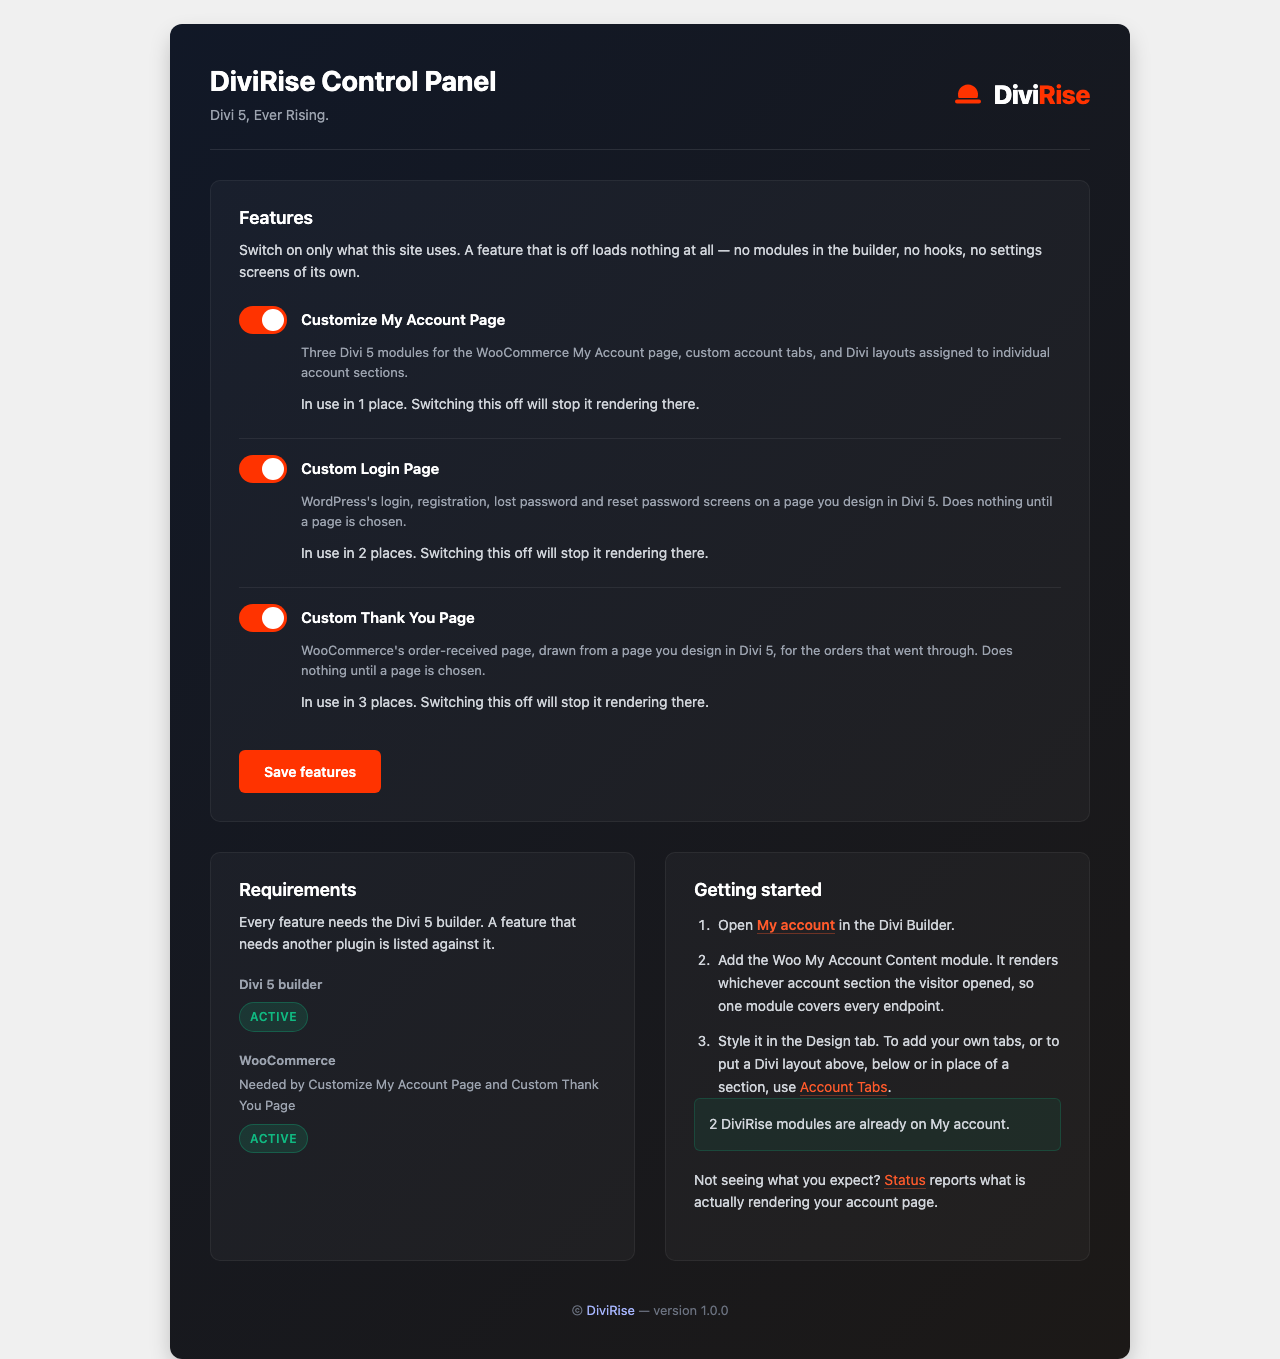
The Status screen
The Status screen shows what the site is really doing, including settings applied in code through filters.
- My Account page — whether it is built from DiviRise modules, WooCommerce's shortcode, or a mix.
- Where the modules are used — every page, post, library layout and Theme Builder template containing a DiviRise module.
- Custom tabs and overrides — your tabs, section layouts and menu visibility rules.
- Settings in effect — Turnstile state and any Cloudflare outages, transparent sections, account notices.
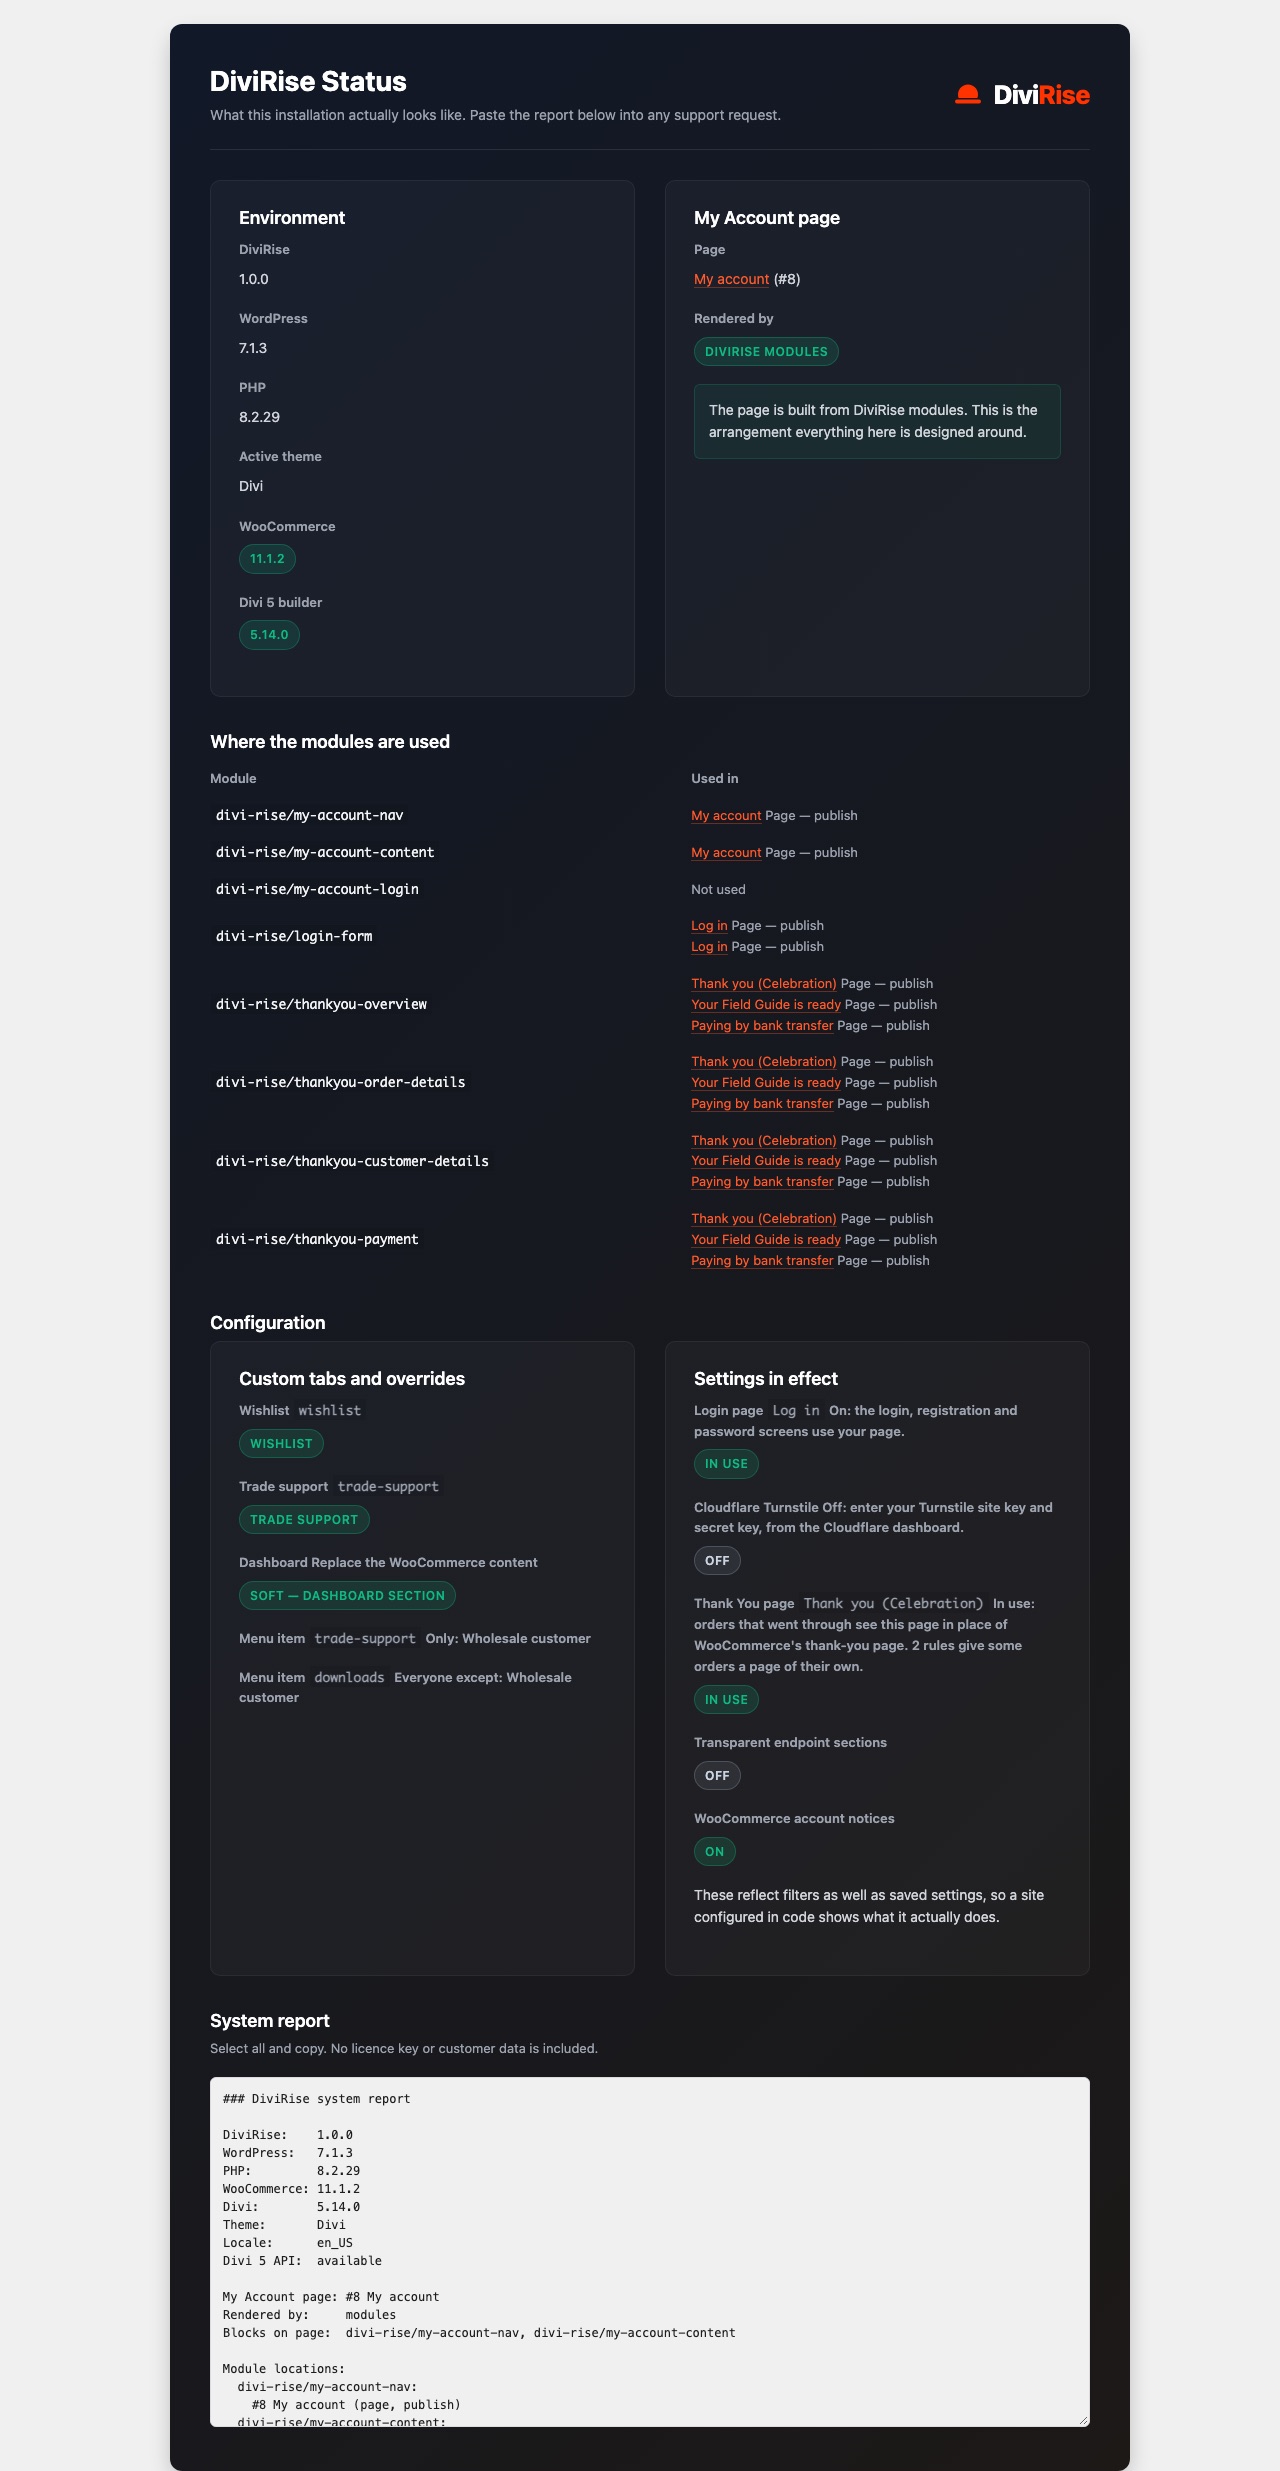
The screen also holds a plain-text system report. Select it, copy it and paste it into any support request. It contains no licence key or customer data.
Troubleshooting and FAQ
Most problems trace back to a missing dependency, a Divi container setting or a WooCommerce setting; the Status screen usually shows which.
| Symptom | Cause and fix |
|---|---|
| Modules missing from the builder | The feature is switched off, or Divi 5 or WooCommerce is inactive. Check DiviRise > Control Panel. My Account modules are in the Woo Modules category. |
| Only the first few menu items show | A parent column, row or section is clipping it with Max Height or Overflow, often from a global preset. Run document.querySelectorAll('.divirise-nav-item').length in the browser console; a higher count than you see confirms it. |
| A menu item is missing though switched on | Its slug was cleared in WooCommerce > Settings > Advanced > Account endpoints. Restore the slug. |
| A custom tab returns 404 | Re-save Settings > Permalinks. |
| Form text turns white | Divi's Text Color option set to Dark makes text white. Set it to Light, or adjust Body Text in the Design tab. |
| Styles missing in a Theme Builder template | Add add_filter( 'divi_rise_enqueue_frontend_style', '__return_true' ); to force the stylesheet. |
| Clicking the menu in the builder doesn't change the content | Expected: the canvas is a static preview. Use Preview Endpoint on the Content module. |
| White corners around a section layout | Divi paints sections white. Make the section transparent, or tick Make layout sections transparent. |
| Locked out after setting up the login page | Visit wp-login.php?divirise-native=1, or add define( 'DIVIRISE_NATIVE_LOGIN', true ); to wp-config.php. |
Frequently asked
Does it work with the Divi 4 builder? No. DiviRise is built only for Divi 5.
Can I use the modules in Theme Builder templates? Yes, in a body layout assigned to the relevant page.
Does it slow the site down? A switched-off feature loads nothing, the stylesheet loads only where a module is used, and icons are inline SVG with no icon font.
Is it translatable? Yes. Login and account wording comes from WordPress and WooCommerce, so it arrives already translated.
Uninstalling
Deactivating keeps all settings. Deleting the plugin removes every DiviRise setting, on each site of a multisite network. Pages and Divi Library layouts it created stay, as ordinary content you can keep or delete.
Support
Email help@divirise.com and we'll reply within 48 hours. Include the system report from DiviRise > Status, with what you expected and what happened.